
How I Landed A Dream Gig: Photographing Dancing With The Stars Live Tour
- Izzy Bouchard

- Feb 6
- 7 min read
I’ve watched Dancing With The Stars on and off ever since I was a kid. This latest season really got me back into the show and was easily my favorite. My wife, Camilla, and I watched it every week, personally rooting for Dylan Efron. When I heard the tour was coming to Bangor, I was already peepin' tickets for us to go for a fun date night. Never did I think I wouldn’t just be at the show, but that I’d be the one capturing it, and having some of the dancers share my work! Sorry babe, but date night was officially rain checked!

How It All Went Down: The Call
After I graduated from NESCom at Husson University, local photojournalist legend, Kevin Bennett became my mentor. He really took me under his wing and showed me the ropes of the freelance world, and since he’s typically the house photographer for the Cross Insurance Center, he’s the guy I look up to for all things event related.
One morning, I opened an email from him that changed my whole week. He mentioned he was going to be out of town for the DWTS event and asked if I wanted to take his place. I was like, umm, Abso-f*cking-lutely dude!!
He got me in touch with the CIC team and the DWTS producers, they checked out my Instagram, approved my portfolio, and suddenly I was signing media forms. Before I knew it, I was in!


Shooting the Event: Is This Even Work??
When January 27th finally arrived, I felt so grateful just to be there. Honestly, even as the photographer, I felt like I should have been paying them to watch such a world class performance! It really didn’t even feel like work.
However, a tour of this scale comes with some pretty tight rules and regulations. Specifically, for the first four songs, I had to remain strictly at the front of house. This meant I couldn't move around for different angles, so I had to be extremely intentional with every shot.
Once those first four songs wrapped, Jonathan (the Marketing Manager for the Cross Insurance Center) guided me up to the balcony. Since I was the house photographer for the CIC, my assignment was also to capture the "atmosphere." I needed those shots of the happy fans and the electric energy of the Bangor crowd so the venue could use them for their own marketing.
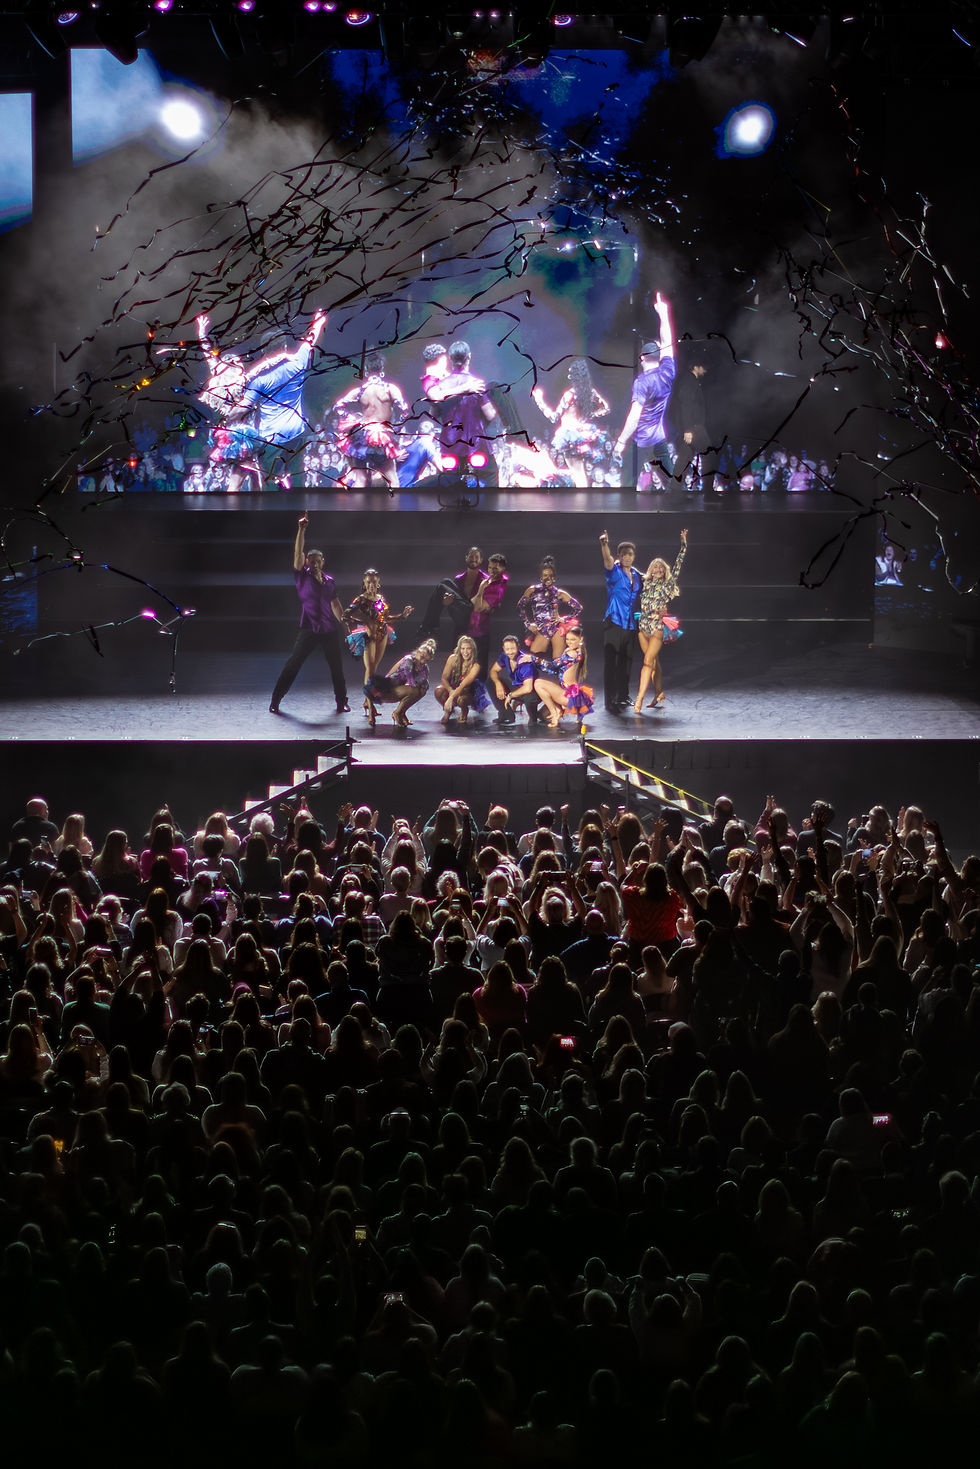
The "One Last Shot" That Went Kinda Viral
I had the option to leave after those first four songs, but there was no way I was missing a second of this show. I had a pretty good feeling there would be a "big bang" at the end, and I’m so glad I trusted my gut.
Jonathan escorted me to the top balcony just as the finale began. We stayed up there until the very end of the last song and the last couple of images I took were of the entire crew center stage as a cloud of confetti exploded over them and a sea of fans. It was the perfect "epic" ending to the night.
I didn't realize how perfect until Val Chmerkovskiy himself shared that specific shot to his story! My notifications absolutely exploded. Then, in an unbelievable act of kindness, Alan Bersten DM’d me to say he loved the photos, made a post tagging me, and actually followed me. Is this even real life!?

Best Night Ever!
I’ve photographed countless weddings for friends, family, and complete strangers, and I love those moments, but this was hands down the best night of my career so far. A huge thank you to Kevin for the trust, to the Cross Insurance Center for the hospitality, and to the dancers for supporting a local photographer's work!!
The Right Gear 📸 & Murphy's Law
When you are hired for any gig, no matter how big or small, you always need to stay prepared for something to go wrong because, well... Murphy's Law. My main camera for the night was my new baby, the Canon R5, but I brought my Canon R6 as a backup. Luckily, the night went flawlessly, but having that second body gives me peace of mind.
The Lens Lineup:
The Tamron 70-200mm f/2.8: This was my absolute workhorse. Shooting from the front of house, it was the only way to get those tight, sharp action shots of the dancers.
The Tamron 24-70mm f/2.8: I used this primarily before the show and during intermission. It was perfect for grabbing establishing shots of the stage and candids of fans in the stands.
The Canon 50mm f/1.2: After the intermission, once I knew I had the "must have" shots, I switched to my 50mm prime for a bit. I wanted to get some more stylized, artistic crowd shots with that beautiful, shallow depth of field look. I only used it for a few shots, but it was totally worth it.
The MVP of the Night: My PGYTECH Shoulder Bag! This little guy came with my PGYTECH ONEMO 2 Backpack and it is a blessing! It is small but mighty! Instead of lugging around my large backpack (which I still love) that would absolutely have been a distraction for viewers, I used this shoulder bag to hold the lenses I wasn't currently using. It’s small but large enough to hold my 70-200mm. This bag made lens swaps a breeze, and I kept my extra batteries, cleaning cloths, and an "extra just in case" SD card in there too. I swear being a little paranoid will save your a$$ someday!
Pro Tips: Shooting the Stars 💃✨
Photographing live stage performances is a whole different beast than say, a wedding or couple's shoot. While the stage is well lit, the house is very dark, there are lasers everywhere, and you're still trying to freeze high speed motion. If you’re looking to get into event photography, here are a few things I learned from working the DWTS event:
Watch the Highlights: Stage lights are bright. I had to keep a close eye on my exposure to make sure I wasn't blowing out the dancers' faces or those sparkling sequins. It's better to underexpose slightly and bring back the shadows in post than to lose the detail entirely! Do not trust the screen on the back of your camera: check your histogram to make sure your highlights aren't clipping.
Shutter Speed is King: When you’ve got world-class pros like Val and Alan moving at full speed, 1/800th of a second is your bare minimum. I kept mine even higher to ensure every jump and spin was tack-sharp.
Full Frame to Crop Sensor: Because I couldn't physically get close to the stage, I used the longest lens in my bag, the 70-200mm. But because I was using the Canon R5, I knew I could switch my settings to the 1.6x crop factor. This helped me compose the shot perfectly in-camera while still retaining plenty of pixels for a high-quality, high-resolution image.
Prevent Banding: Because there was a ton of different lighting happening, LEDs, lasers, and shifting colors, I selected Mechanical Shutter and turned on Anti-Flicker settings to avoid any weird banding or "stripes" in my shots. Electronic shutters on many cameras (even high-end ones) can cause "banding" when dealing with the refresh rates of LED stage panels and certain lasers. Sticking to mechanical is the safest bet for stage work.
Know Your Gear: I know the capabilities of my R5. I knew I could really push a high ISO and do some light denoising in post to maintain high picture quality. I wouldn't say the same for some older DSLRs. Just know your gear and its limits before you make any decisions you regret.
Stay Until the Final Bow: Like I mentioned with the confetti shot, it's worth staying until the end. You're certainly going to miss all the photo ops if you aren't even there. If the venue allows you to stay, stay! Sleep when you're dead.
How to Get Gigs: Collaboration is Greater Than Competition 🤝
I am frequently asked how I actually get gigs like this one. While some might just think I'm lucky , it’s really about being strategic long before the inquiry comes in. If you want to break into the world of freelancing, here is my best advice:
Networking & Mentorship: I can't stress this enough. My connection to Kevin Bennett has meant so much to me and my business. Having a mentor in any trade or craft can essentially jumpstart your journey. I knew I wanted a mentor, so I asked my photography professor at NESCom, and he referred me to Kevin. Boom! The connection was made and I made sure to be on my best behavior as his mentee. People hire people they trust. Build genuine relationships with other photographers in your community. When they can’t make a gig, you want to be the one they trust to step in. I always say, collaboration is greater than competition.
Gain Relevant Experience: Your first gig is rarely your "dream gig." You have to start somewhere and build a portfolio that speaks for itself. During my first year as a freelancer, I took on several low paying or volunteer gigs. I spent time photographing events for the Bangor Historical Society, local 5K races, and other community gatherings. This is where I learned to work with complete strangers and navigate large scale events. Even when the pay was low, my goal was always to under sell and over deliver. Providing that "wow factor" is what makes people remember you. Those early shoots gave me the foundation I needed to grow. One thing always leads to another!
Reach Out & Get Your Name Out There: Research the venues you want to work at and find out who handles their marketing or production. Send a polite, professional email with a link to your portfolio. Even if they don’t need you today, you’re now on their radar for tomorrow.
Be the Photographer YOU Would Want to Hire: This is the most important one. Be on time. Be respectful of everyone. For the love of everything, do not complain about anything at any time in front of anyone!! If you are easy to work with and turn around high-quality work quickly, people will want to work with you again.
Comments